Hello! Thanks for visiting my site. Today, I’ll be showing you two simple but elegant wedding card making ideas.
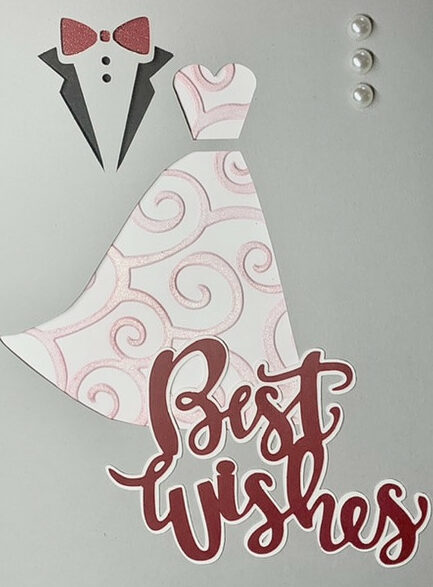
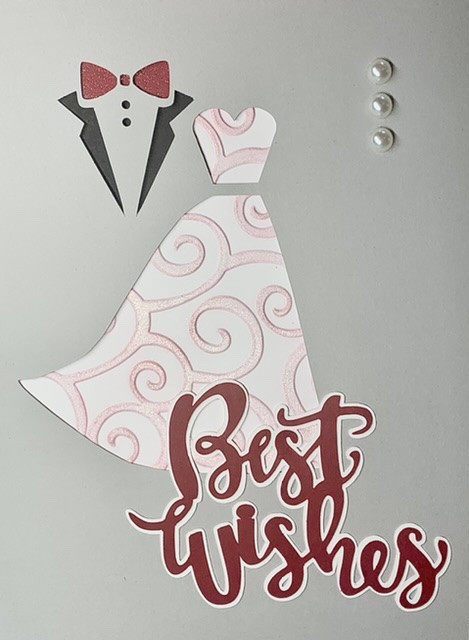
The first card that I’ll be showing you is what I call the Bride and Groom Card, which is shown in the picture above.
I called the second card the Wedding Bicycle Card, shown below:

Please join me as I show you how I made these two cards!
Bride and Groom Card
Most of the parts for this card are items that I purchased from the Silhouette Design Store website. Silhouette is a company that makes electronic cutting machines (somewhat similar to Cricut) like the Cameo and the Portrait. I currently use the Portrait 3 which is a smaller, less powerful version of the Cameo 4. On the Silhouette Design Store website, you can purchase printable images, cutting designs and fonts (and more) from their online store for a very reasonable cost, then use your cutting machine to cut or draw the designs. I usually go back and forth between mostly using my Portrait and then mostly using my Sizzix Vintaj Big Kick (manual die cutting machine like the Sizzix Big Shot), and I’m solidly in my Portrait phase right now. I’ll put a list of the supplies I used to make these two cards at the bottom of this post.
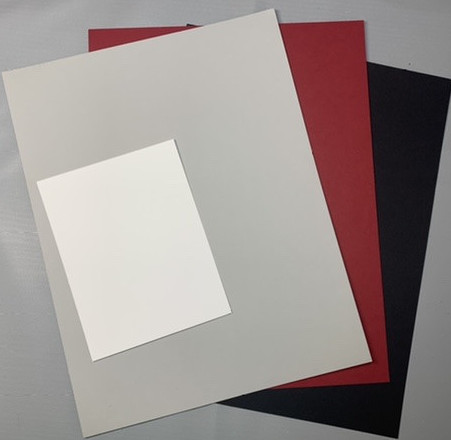
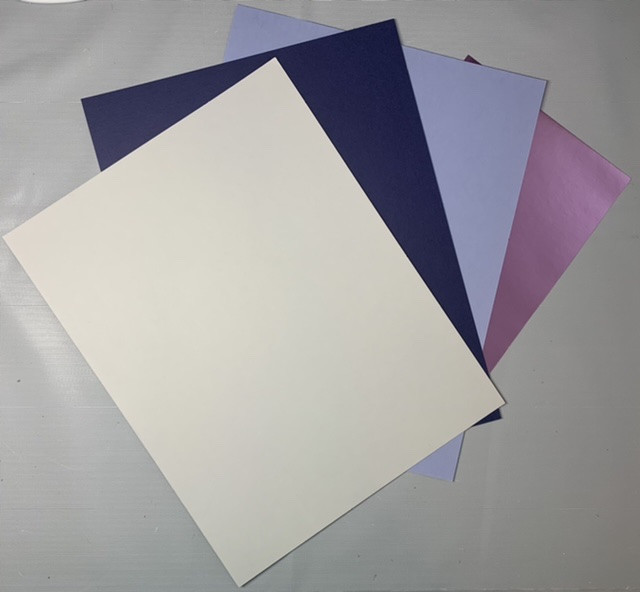
Normally I pick my card colors before deciding the card design, but this time I picked the card designs first which helped me to decide which colors to use. Because both cards are wedding cards, my color choices are narrowed down quite a bit. Typically, I use white, gold, silver/gray and muted colors for wedding and anniversary cards. Here are the colors that I chose:
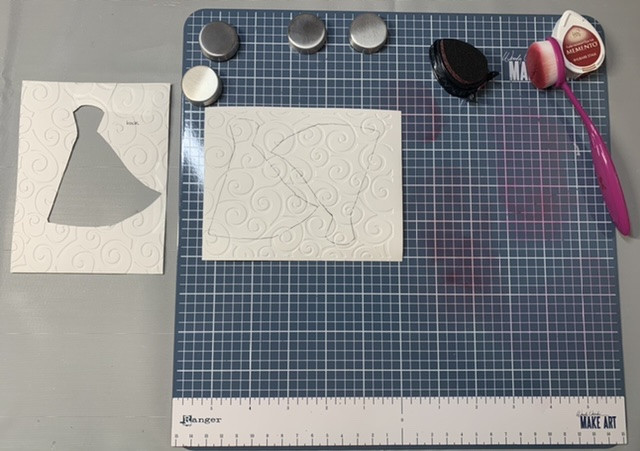
Once I chose the colors, it was time to choose the card design. I found a cute design that I liked but once I cut it out, I didn’t like how the stripes in the brides dress looked with the embossed paper that I was going to use. Here’s a picture of how the original bridal dress design looked with the embossed paper behind it.

This looked WAY too busy for my taste. I decided to edit the shape in Silhouette Design Studio by getting rid of the horizontal wavy lines. Once I had the dress how I wanted it, I used my Silhouette Portrait to cut out the card base as well as the groom’s bow tie. For the bride’s dress, I used my D’vine Swirl embossing folder along with my Big Kick Die Cutting/Embossing Machine.
Once I cut out my card parts, it was time to use a darker red ink on the bride’s dress to coordinate with the groom’s bow tie. I used an ink blending brush and lightly brushed ink onto the raised parts of the dress. Then I flipped the paper over and traced the dress outline onto the paper. I was happy that I could fit two dresses onto the one piece of paper because I love any opportunities to make card parts for more than one card at a time. That will save me time later when I go to make another one of these cards.
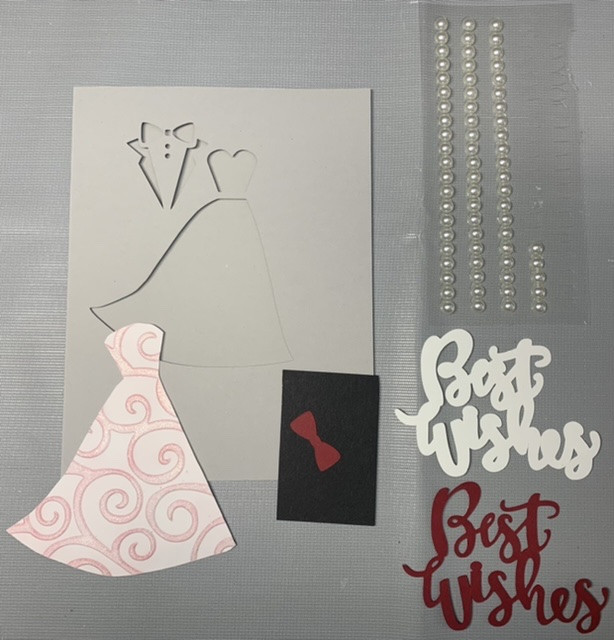
Next, I used a Zig Wink of Stella pen on the bride’s dress and on the groom’s bow tie. The Wink of Stella pen is amazing! It really adds that extra something to a card part and keeps it from looking basic. Here’s a pic of the unassembled card parts:
Putting the Bride and Groom Card Together
On the inside of the card, I taped the black and red cardstock into the correct places so that the groom’s lapels would be black and his bow tie would be dark red. Next, I did the same for the bride’s dress with my embossed and inked white cardstock. Finally, I glued the sentiment to its shadow, glued it to the card and added a few pearls in the upper-right area. Here’s a picture of the finished card:
Wedding Bicycle Card
To make my life easier, I had planned to use a similar color scheme for both cards in today’s post. But easy lives are boring, am I right? The only color that the two cards have in common is the gray that I used as the card base for both cards.
After deciding which colored cardstock to use, it was time to choose my card design. I came across a tandem bicycle card design in Silhouette’s Design Store and loved the idea of using it along with a cute saying for a wedding card. I decided to use “better together.” Here a screenshot of my computer as I was using the Silhouette Studio software to size the designs just before cutting them.

Once again, I cut out the card elements using my Silhouette Portrait. Unlike the Bride and Groom Card, all of this card’s parts were cut out on the Portrait.

Putting the Wedding Bicycle Card Together
Once all of my card pieces were cut out, it was time to assemble the card.

Here’s a picture of the finished card. I love how the pink metallic paper in the frame, the text background and the flowers catch your eye and pull the card together nicely.
Conclusion
That’s it for today, guys! I hope you enjoyed this post and got some wedding card making ideas that you can use for yourself. Thanks so much for spending some time on my site. Have a great day!
Supplies Used:
Silhouette Portrait 3
Silhouette Design Store Design #118970 TANDEM BICYCLE FOLDED WEDDING CARD
Silhouette Design Store Design #277819 BETTER TOGETHER
Silhouette Design Store Design #130421 WEDDING CARD
Silhouette Design Store Design #246703 BEST WISHES PHRASE
Neenah Classic Crest Cardstock – Solar White, 110 pound weight
Recollections Pastel Foil Cardstock Paper (2nd in the pack)
Recollections Shades of Red Cardstock Paper (3rd in the pack)
Recollections Neutrals Cardstock Paper (2nd in the pack)
Dark Blue/Purple and Light Blue/Purple cardstock – I’m not sure what company makes them. I bought them at a second-hand craft store that is now out of business.
Recollections Black Cardstock Paper
Fiskars SureCut Portable Paper Trimmer, 12 Inch Cut
Hero Arts Infinity Nesting Rectangles
The Paper Studio Self-Adhesive Pearl Gemstones
Crafter’s Square Jewel Pearl Stickers
Tsukineko Memento Dew Drop Dye Ink Pad – 301 Rhubarb Stalk
Cuttlebug Embossing Folder – D’vine Swirl
Zig Wink of Stella Glitter Pen
Tombow MONO Multi Liquid Glue, 0.88 Ounce
Vintaj Big Kick Die Cutting/Embossing Machine
Oh Dawn, how beautiful and thoughtful for you to make special cards around special events and lifes joy’s. Your site is very inviting and professional. God Bless your work!
Thank you so much ❤️